RV Rubber Roof Repair Part I:
The Good Reliable EPDM Roof Will
Need Attention Too!
For A Long Time
The EPDM (Ethylene Propylene Diene Monomer), often referred to as a rubber roof, is probably on more Class C Motorhomes than any other type of roof. It is not the newest technology, and it may not be the best weather sealing solution available in today's market.

But, if you do a cost-benefit analysis on EPDM, it will come out looking pretty good. It is still one of the least expensive roofs and has a long proven track record of performance.
There are a ton of Class C Motorhomes out there with this older, but proven, roofing solution. And in all likelihood, some of them will need a little sprucing up.
Therefore, if EPDM is on your roof, you should know that it will need attention; and with a little bit of luck, you will not ever have to do any more to it than clean the thing.
The question is, how often should this be done? Well, like everything else out there, it depends. As a rule of thumb, I want to stay off my roof as much as possible. Just being up there will track dirt, grime, and grease. I simply do not want to grind this stuff into my rubber roof.
This tracking problem occurs most often around the ladder. I've noticed that when I step out off of my ladder onto the rubber roof; I always step in the same spot each time. It has to do with the hand holds on the ladder. Getting on the thing is sort of a learned technique.
wants to end the day!
To answer the question about how often a rubber roof should be cleaned, a quote from DICOR (a leading manufacturer of EPDM roofing material) recommends the following, "To maintain your warranty, all that is required is periodic cleaning at least 3 to 4 times per year".
Interestingly enough, DICOR has also determined that there is no need to apply any type of protectant on the rubber roof. However, they do not take issue with putting a protectant on an EPDM roof as long as it does not contain ANY petroleum distillates. Petroleum causes a blistering effect that raises the EPDM up off of the wood sub frame. When this happens, there is a loss of adhesion. This can allow water intrusion... water intrusion means you will have to do some type of RV roof repair.
inspection on a regular basis.
Of Potential Leaks
In a year's time, an average Class C Motorhome rubber roof will see temperature variations from over 100 degrees F. to potentially below freezing. This will cause expansion and contraction issues. These issues often display themselves as small cracks.
They can be seen on the edges of the roof and anywhere there has been a penetration in the roof... ladder brackets, vents, air conditioner, etc.
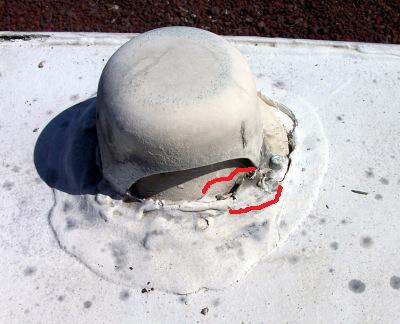
The Graphic to the right shows a vent with several years of wear and tear on the self leveling sealant that was used to act as a barrier between the rubber roof and this vent.
At first glance, it doesn't look too bad. However, if one were to look closely at the area circled in red, on the right side of the opening, it can be seen that the sealant may be peeling back a little bit. It is hard to tell, but I felt that this deserved further investigation.
Having said this, there is a kind of catch 22 going on. Rule number one when dealing with roofs would be... do no harm. What this means is, if it is working, leave it alone. The problem is, how does a person know if the sealing barriers are working? Messing with it might cause a problem where none exists. So, when is a good time to start ripping things apart?
Well, if you are somewhat handy with basic tools, you can perform a leak test on your rig. After you have pressurized your Class-C-Motorhome it is a simple matter of spraying the outside of your rig along any seams on the rubber roof using a bubble solution. You then look to see if any bubbles form. If a bubble becomes apparent, you have a leak! This is a pretty straight forward test. Using this method will go a long way toward doing necessary repair damage to your rig.
This do no harm philosophy makes for a very subjective process that takes into account multiple factors. It is also a reason that many people do not want to attempt ANY type of RV roof repair on their own. If you feel this way, that's fine. There are many qualified Class C Motorhome roof repairmen that can do the job in a short time.
My personal experience tells me to look at the general condition of a roof. If it is still white, with a few mold spots and some dirt on it, I clean it off using a specific product
Any RV supply store can guide a person in the right direction when it comes to the selection of product choice. After a thorough cleaning, I get down on my hands and knees and look everything over very closely.
What I look for are cracks that can be very small (as little as pin holes) or somewhat larger. The photo below shows an area with loose silicon that I chose to replace with a Geocel product call PRO FLEX.
Bottom line, Geocel has all the sealing qualities of silicone, but it is capable of being reapplied to itself, or even painted, after it dries... I find that if I can use my finger and move the silicon away from the roof edge, it probably has a problem.
If it has a tendency to stay in place without forcing it, it is probably going to still be a good water barrier.
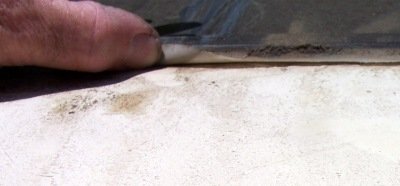
that may cause problems.
Inspect Your RV Roof
If I see smaller cracks that are not involved with silicon, I simply apply some or, depending the location, ProFlex RV Flexible Sealant.
If the penetrating crack is large and looks dusty, rusty, or grimy... which it probably will, this would indicate the need to investigate further. This is very subjective.
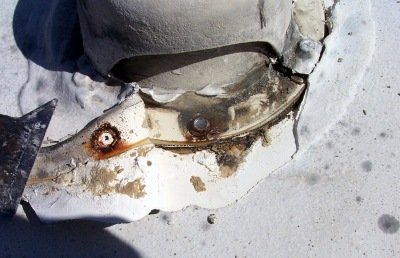
Going back to the issue of potential water intrusion through my vent, I felt that there was enough evidence to probe further.
I started to remove some sealant and exposed what appeared to be a leak. Referring to the graphics above and below, you will see rust and dirt where there shouldn't be any. If the sealant was sticking properly this rust and dirt simply would not be there. So I tore it down further and discovered what appeared to be universal water intrusion.
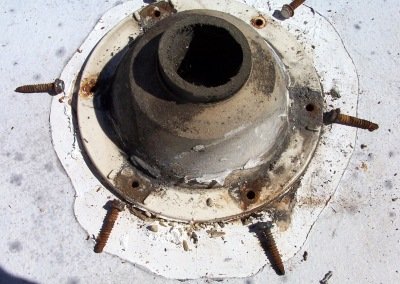 Just look at how rusted out the screws are. There is not a lot of security here... I see water intrusion on all of the access points securing this vent to the surface of the roof.
I went ahead and cleaned everything up, replaced the screws and resealed it. This looks like something that has been going on for awhile.
As a note, I have owned my Class C Motorhome for four years. There had been no evidence of leakage inside the rig until our trip to Wright's Beach in January, 2008.
After getting home from that trip and looking everything over, I discovered evidence of a leak in the shower area. There were dirty streaks running down the shower walls.
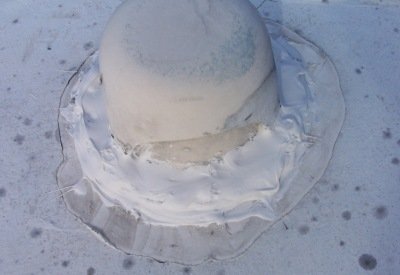
Referring to the graphic on the right, you can see that there is a good adhesion now where before things were starting to lift. You will also note that I did not remove all of the old sealant. Where it showed evidence of good adhesion, I left it alone and just put the new on top of the old. There was no point in attempting to remove this sealant because if I did, there was a good risk of tearing the thin EPDM rubber roof underneath.
As A note, if you do make a mistake and tear your rubber roof it need not be catastrophic event. There is a liquid roofing product on the market. It technically called Liquid EPDM. At any rate, for small RV roof repairs it can be a satisfactory solution.
Then Forget About It
Now, here is the kicker. When I first purchased my Class C Motorhome, I did a lot of the type of stuff that we talked about here. Three years ago I removed a ton of silicon, I cleaned my black roof and found out it was supposed to be white. I found where the rubber roof sheet had worn through to the wood. That's right... when I cleaned the sucker, I found wood in places. I took care of all these things.
and I thought I was good to go. It looked so good when I was done, I believed that it would last forever. But it won't. I now know that I have to stay on top of things, or I will get leaks.
When a major leak occurred (in the cab-over section), I thought I had destroyed my Class C Motorhome. However, I had the good luck to have a friend that was not afraid to tackle a tough project.
I learned a VERY valuable lesson this last summer. It all boils down to paying attention. I now know that I either have to go up on my RV and check out the rubber roof, or I have pay someone else to do it. Either way, it is soooo much easier to fix a leak before it becomes a problem.

Leave EPDM Roof Repair I and go to EPDM Roof Repair II
Go to Comment and Response Page
Return To Top Of Page
Leave Rubber Roof Repair: The Good Reliable EPDM Roof Will Need Attention Too! And Return RV Repair: Sooner Or Later, Something Is Going To Need Fixing! Page
Leave Rubber Roof Repair: The Good Reliable EPDM Roof Will Need Attention Too! And Return To The Class C Motorhome: How To Achieve The Maximum RV Lifestyle! Page


