This Simple Leak Test Will Find Small Undetected Water Leaks
We have a lot to think about in today's economy. Many people are keeping their Class C Motorhomes longer; and therefore, water damage caused by unwanted leaks may become a concern. After all, weather seals can only hold up for so many years.

Wet weather can cause unexpected leaks that can seem to appear out of nowhere. Depending on the location and age of a unit, these leaks causing water damage could be a serious problem.
Unfortunately this type of water damage usually becomes apparent only after a prolonged leaking event.
In many instances it takes time for many small leaks to come to our attention. Therefore, you may want to ask yourself these questions:
- Would it be of value to do a simple leak detection test and find these pesky areas of barrier breakdown?
- Would it make sense to do this before serious damage was done to your rig?
During the Dry Summer/Fall Months Will Allow You to Fix a Leak Before Water Does Any Damage
If you have read my pages on some of the leaks and water damage issues that I have had in the past, you will understand my desire to perform a dry season leak test. I have long understood the concept of over-pressurizing a rig. This is a simple process of creating the condition of increased air pressure inside an RV. The force of over pressurizing will allow you to use a bubble solution to find potential leaks on the outside "skin" of your Class C Motorhome.
The military uses this technique to find potential leaks in their portable shelters during the refurbishing process. A shelter is a small room around 15 to 20 feet in length that could be placed on a truck bed. They use these things for a variety of applications like workshops, command and communication centers, and so on.
The question is how to complete a leak test. Some folks have had good results using a leaf blower stuck in a window. I tried this, and it was simple enough to do.
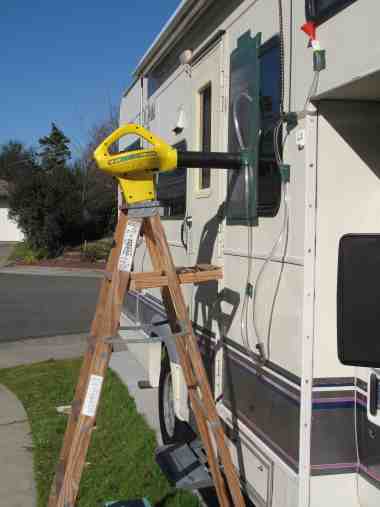
However, I did not have good results. I'm not sure if my blower was too small, or I had so many leaks that I could not build up adequate air pressure! I do know that leaf blowers are designed to generate a large velocity of air movement... not necessarily a large volume of air. I wanted to be able to put a large volume of air into my Class C Motorhome.
So, I scrapped the idea of using a leaf blower and went with a large bladed fan. This seemed to work. I was able to build a sufficient over-pressure condition in the rig.
It is important to stress that before I was able to get any of these overpressure leak test results, I had to insure that the motorhome was sealed off properly.
All motorhomes are designed to breathe to a certain extent. It is imperative that you close up any areas venting to the outside, or you will have a very difficult time building enough internal pressure in your rig to do a leak test.
As the graphic below shows, I placed tape and plastic over the various sink drains. I also blocked the refrigerator along with the stove and heater vents. Make sure the roof and cab vents are closed and/or blocked. It is very important to block any access points that would prevent air pressure from building up. This can be a trial and error thing.
you will not have a successful leak test.
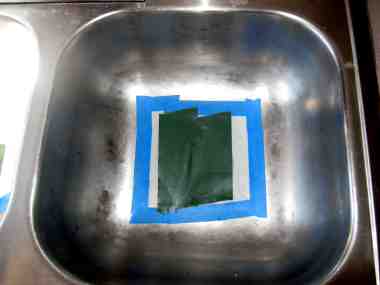
Using just one fan I was able to generate some pressure. But I felt that I could do better.
I was getting a reasonable pressure condition. But, I experienced a back flow that would slow the fan down. As the back pressure built, this pressure on the fan would slow down the RPMs... therefore, I would lose force... The less force, the less atmospheric pressure change.
This was self defeating. However, I was able to overcome this problem by using a blower and two fans in a series as the graphic below shows. My main power fan is sitting on the table. There is an additional box fan inside the RV... up next to the window sucking air in. The leaf blower is used to push air onto the outside fan.
This resulted in better control of back flow pressure and an increase in performance and efficiency. This increase in efficiency brought about the air pressure change inside the rig that enabled me to detect external leaks.
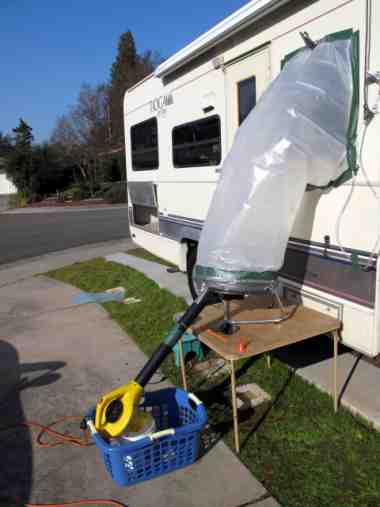
Here I Have A Leaf Blower And Two Fans In Series...
One Of The Fans is Inside Sucking In Air
Use A Simple, Clear Tube Manometer To Insure
That You Do Not Create Too Much Pressure And Damage Your Class C Motorhome
If you notice on the above graphic, there is a transparent plastic tube with +/- a cup of water in it. It is hanging in a U-shape next to the leaf blower. This tube becomes a crude manometer with one end inserted into the RV and the other end outside of the unit. Your manometer will then measure the difference between the atmospheric pressure on the inside versus the outside of your RV.
As pressure builds in your Class C, the water in the clear tube will move. The more pressure differential you can apply, the greater the distance the water will move.
I was using this device simply to see if I could develop ANY atmospheric level of change. It turns out, that with my system of a leaf blower plus fans, I got just over a quarter of an inch of water movement... good enough!
I first used a spray applicator along with a small 3" soft bristled paint brush to help spread the bubble solution on the suspected area of inspection. However, after some trial and error experimenting, I came to the conclusion that you get better results spraying the bubble solution and then using your finger to alter the viscosity of the liquid.
Sometimes it takes a little persuasion to get any bubbles to develop. This is like most things, learn as you go. The good news is you are not likely to do any harm unless you are over-pressuring your rig.
It is possible to do damage if too much atmospheric pressure can be developed. Therefore, I would highly recommend that you use a manometer... just to keep an eye on things.
Up on the roof, I found a couple of areas that were able to develop bubbles. This leak test was a success! I also found areas of potential water penetration that had not manifested themselves in observable damage. In addition, I uncovered issues along the sides of the RV. All things considered, it was worth the effort.
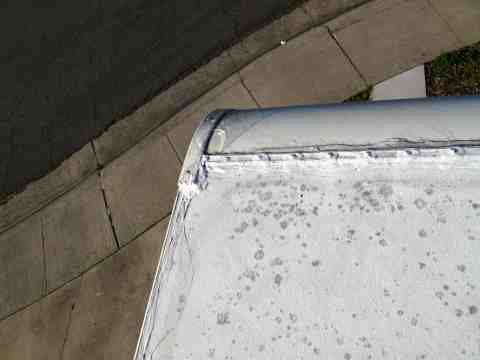
Top Left Of The Roof Line
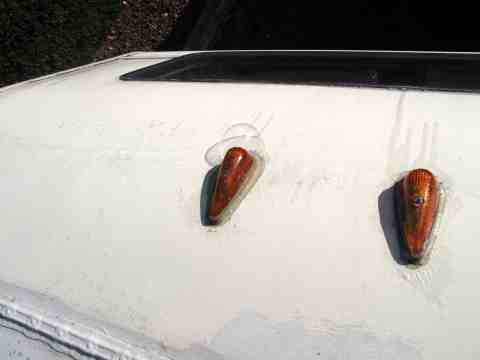
Not Where You Want A Leak!
If you can measure some pressure differential and you find that you are not developing any bubbles, you are reasonably sure that your leak test procedure was successful and rig is okay.
Return To Top Of Page
Leave A Simple Leak Test Will Find Small Undetected Water Leaks And Return RV Repair: Sooner Or Later, Something Is Going To Need Fixing!
Leave A Simple Leak Test Will Find Small Undetected Water Leaks And Return To The Class C Motorhome: How To Achieve The Maximum RV Lifestyle! Page
YOUR STORIES
1995 Tioga Montara
Had a Leak - Ouch!
A Simple Way To Put An Electrical Thermostat On A Small Space Heater
In A Truck Camper!
A Great Destinaton, With An Unexpected Outcome!
Test Link
Below: For An Alternative Destination... A Four Mile Hike Around Sugar Pine Reservoir

A Good Place To Begin The Joshua M. Hardt Memorial Trail Is At The Dam. This 3.5 Mile Trail Is Good For Foot Traffic And Bicycles... No Motorized stuff

The Manzanita Day Use Area Is A Good Place To Sit And Watch The Wind
Play With The Water!

Another View From The Joshua M. Hardt Memorial Trail... Morning and Evening Are The Best Times To Hike This Trail. The Still Reflections Will Capture Your Attention
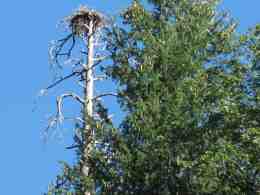
You May Want To Bring A Camera... There Are Large Birds Of Prey High In The Ski


